
// Sample report
Sample dilapidation report: what you actually receive
Below is an example of the main sections in our dilapidation reports, using illustrative data. Every report has the same structure: report details, photo index, measured crack register and other defects, signed by an engineer.
 PHOTO INDEX · P-001
// Report anatomy
What's in a dilapidation report, section by section?
The short answer
An engineer's dilapidation report has six parts: report details, a photo index located on a plan, a measured crack register, other existing defects, site elements and public assets, and the engineer's signature with the limits of the inspection. Each part exists so a defect can be found again and compared after the works.
1. Report details
Property, purpose, who commissioned it, inspection date and weather, and areas not accessed. This is what makes the record defensible.
2. Photo index
Every elevation and accessible room, numbered and located on a plan so each shot can be retaken from the same spot.
3. Crack register
Each crack's reference, location, width, length, orientation and photo. The part that settles disputes.
Damage categories
Wall cracks rated against AS 2870 Appendix C, from Category 0 (negligible) to Category 5 (very severe).
4. Other defects and site elements
Water stains, sticking doors, uneven floors, fences, retaining walls, paving, pools and public assets where required.
5. Signature and limitations
The engineer's signature, what was and wasn't inspected, and how the record should be used after the works.
// 1. Report details
Report details: who, what, when and where
The first page fixes the record in time. Without a date, the weather and a note of what couldn't be accessed, a report is easy to challenge.

// 1. Report details
States the property, the purpose (for example, a pre-construction record ahead of excavation at the neighbouring site), who commissioned it, who was present, the weather and any areas that couldn't be accessed. These details are what make the report defensible later.
// 2. Photo index
Every photo numbered and located
Photos are taken in a fixed sequence (each elevation, then room by room) and numbered against a simple plan, so anyone can find the same spot again.
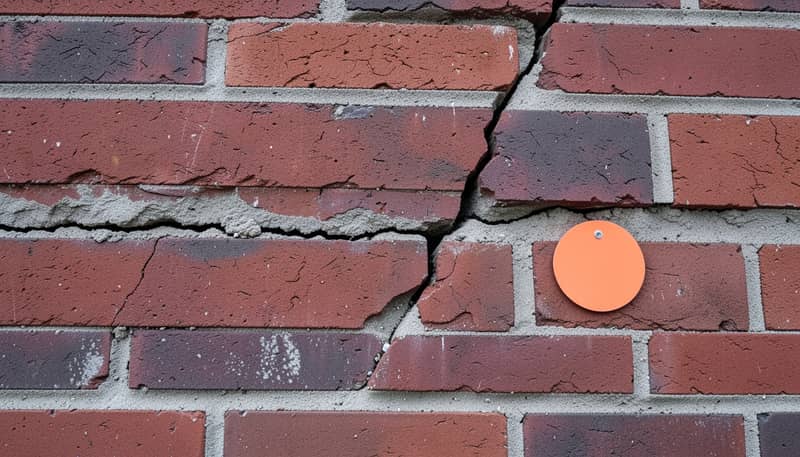
Front elevation, left of entry. Stepped crack through mortar joints. Register ref C-01.

Side path, east boundary. Branching crack in concrete paving. Register ref C-04.
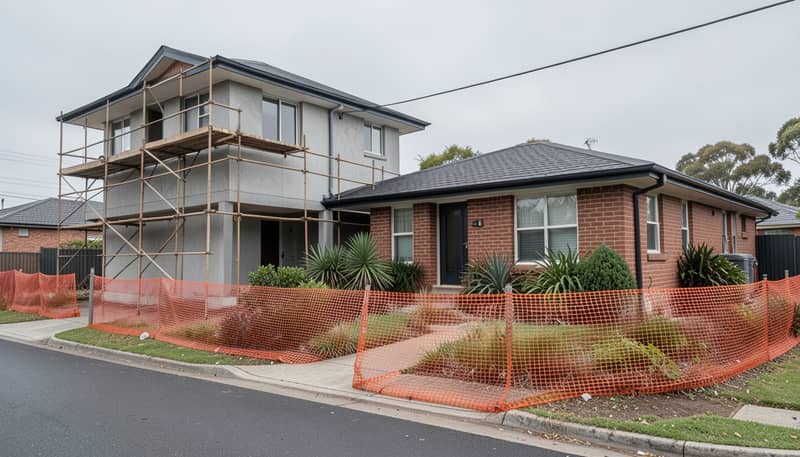
Boundary with works site. General view of fence line and adjoining construction.
// 3. Crack register
Each crack measured, not just photographed
This is the part that settles disputes. Each crack gets a reference, a location, a measured width and length, and the photo it appears in.
| Ref | Location | Element | Orientation | Width | Length | Photo | Category |
|---|---|---|---|---|---|---|---|
| C-01 | Front elevation | Brick veneer | Stepped | 1.5 mm | 620 mm | P-014 | Cat 2 |
| C-02 | Bedroom 2 | Plaster ceiling | Linear | 0.5 mm | 1,100 mm | P-047 | Cat 1 |
| C-03 | Kitchen | Wall/cornice | Horizontal | <0.1 mm | 450 mm | P-052 | Cat 0 |
| C-04 | Side path | Concrete paving | Branching | 3.0 mm | 1,450 mm | P-031 | n/a |
| C-05 | East boundary | Masonry fence | Vertical | 2.0 mm | 900 mm | P-028 | Cat 2 |
| C-06 | Bathroom | Wall tiles | Diagonal | Hairline | 300 mm | P-061 | Cat 0 |
Damage categories describe wall cracking only; paving and other site elements are recorded but not categorised.
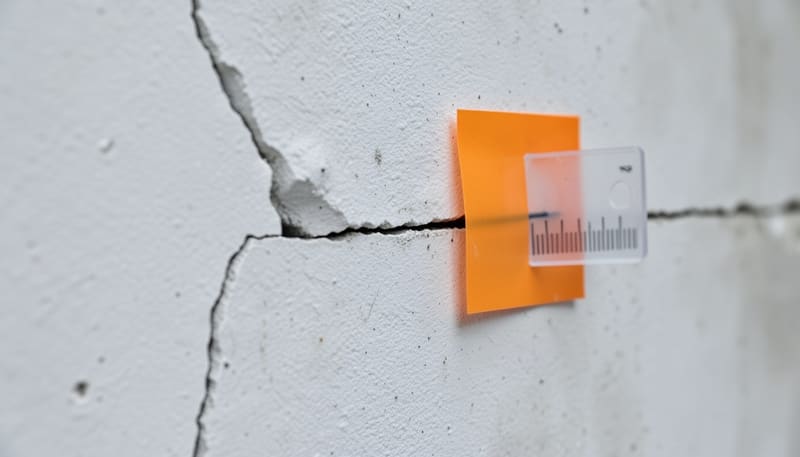
What each column in the register is for
- Ref and location so the crack can be found again on the plan
- Width and length measured, so growth can be proven or ruled out
- Orientation (vertical, horizontal, diagonal or stepped), which helps an engineer read the cause
- Photo reference linking each entry to its picture
Why measured widths matter
If a neighbour says a crack is new or wider, the post-construction inspection re-measures the same crack and compares the numbers. Read what a dilapidation report is for how the comparison works.
// Damage categories
How are wall cracks categorised?
To describe wall cracking consistently, many engineers use the damage categories in AS 2870 Appendix C. The approximate crack width for each category is shown below, but width is only a guide.
- Cat 0Negligible< 0.1 mm
Hairline cracks.
- Cat 1Very slight< 1 mm
Fine cracks which do not need repair.
- Cat 2Slight< 5 mm
Cracks noticeable but easily filled. Doors and windows stick slightly.
- Cat 3Moderate5–15 mm
Cracks can be repaired; some wall may need replacing. Doors and windows stick, service pipes can fracture, weathertightness often impaired.
- Cat 4Severe15–25 mm
Extensive repair: sections of wall broken out and replaced. Frames distort, walls lean or bulge, some loss of bearing in beams.
- Cat 5Very severe> 25 mm
Major repair, partial or complete rebuilding. Beams lose bearing, walls lean badly and need shoring. Danger of instability.
Width isn't everything
The category also depends on the number of cracks and other signs such as sticking doors and windows. Your report states how categories were applied. Read more about Australian Standards and dilapidation reports.
// 4. Other defects and sign-off
Everything else that could be argued about later
Beyond cracks, the report records other existing defects and the site around the building. It closes with the engineer's signature, the limits of the inspection (for example, areas not accessed) and how the record should be used after the works.
- Water staining and damp marks on ceilings and walls
- Uneven floors, sticking doors and windows, separated joints
- Damaged tiles and existing repairs, so old patches aren't mistaken for new damage
- Site elements: fences, retaining walls, paving, driveways and pools
- Public assets at the frontage when your consent conditions ask for them
- Signature and limitations: what was inspected, what wasn't, and why
Get a fixed quote within 1–2 business hours
Starting from $390 + GST. Pre-construction, neighbour, post-construction and commercial reports.
// Comparing reports
How do you tell a useful report from a weak one?
Use this checklist on any dilapidation report, ours included. The warning signs are what make a report hard to rely on in a dispute.
A useful report has
- Every crack measured for width and length
- Photos numbered and located on a plan
- Inside rooms included wherever access allows
- Date, weather and areas not inspected stated
- An independent, qualified signatory
Warning signs
- Photos with no captions or locations
- Cracks called "minor" with no measurement
- External-only when inside access was possible
- No inspection date or limitations
- Prepared by someone who also quotes for repairs
Comparing providers? Read engineer vs building inspector for dilapidation reports.
// Questions
Frequently asked questions
Still unsure? Call 07 2150 0579 and an engineer will talk it through.